Le 26 mai 2026 marquera le 10e anniversaire de la découverte par le contributeur historique @Comintern de ce message cryptique à la clé de resource 18089 de la librairie VBE7INTL.DLL:
STRINGTABLE
LANGUAGE LANG_ENGLISH, SUBLANG_ENGLISH_US
{
 18080, "Tile Horizontally"
 18081, "Tile Vertically"
 18082, "Arrange Icons"
 18083, "Microsoft Visual Basic for Applications Help Topics"
 18084, "Search Reference Index..."
 18085, "Obtaining Technical Support"
 18088, "About Microsoft Visual Basic for Applications..."
 18089, "Long Live the Cucumber"
 18090, "Break On All"
 18091, "Break In Ole Server"
 18092, "Break On Unhandled"
}
Le projet Rubberduck a toujours voulu s’approprier cette phrase et s’en servir quelque part d’une façon ou d’une autre.
Rubberduck Core marine ce concombre depuis un certain temps, et fait de cette phrase son slogan, en latin:
Gravé dans la pierre, VIVAT CUCUMIS se lit en latin comme une prophétie ancienne.
Il y a plusieurs niveaux à cette imagerie: plongeons.
Gravé dans la pierre
Quand on dit de quelque chose qu’il est gravé dans la pierre, on décrit quelque chose d’immuable, ou qui n’est pas prêt de changer. Un peu comme les spécifications d’un certain langage de programmation.
La pierre taillée évoque l’antiquité et la renaissance, mais aussi les pierres tombales et les cimetières, où l’on pourrait s’attendre à retrouver une langue morte comme le latin… ou VBA. Ça dit “ceci existe depuis longtemps”, mais aussi “ceci fait partie de notre héritage”.
La pierre est une fondation solide, noble. Elle est aussi lourde, et peut être un fardeau tout comme le code hérité – ou pour Microsoft tout comme le support des librairies d’exécution de VBA. Elle dit malgré tout “ceci existera encore longtemps”.
VBA est mort, vive VBA!
Peut-être que le proverbial concombre se voulait réellement référer à Visual Basic même, mais c’est sans importance de toute façon parce que VBA a effectivement survécu, et donc le soulier fait, même si c’est a posteriori.
L’utilisation d’une image qui pourrait être interprétée comme une pierre tombale pour quelque chose qui est lié à VBA assume complètement la nature “intuable” du langage et la profonde ironie de le voir survivre à chaque produit ou technologie qui tente désespérément et successivement de le remplacer : VBA est mort, longue vie à VBA!
Modernisation
Rubberduck Core conserve les racines et fait évoluer le concept, alors on passera éventuellement de la pierre au métal – à l’acier :
Gravés au laser sur un médaillon en acier, les mêmes mots deviennent à la fois un hommage, une promesse, une réalisation, un… porte-clé sans doute.
L’acier est toujours la pierre, en quelque sorte. Cuisinée un peu certes (bon d’accord, carrément séparée du métal…), mais néanmoins il vient de lapierre. Brute, lourde et difficile à manier, maintenant raffinée, élégante et polie, relativement légère mais robuste et durable. Et brillante aussi. L’âme y est clairement toujours.
C’est précisément ce qui va se produire avec Rubberduck : le concombre ne fait que mariner encore un peu… parce qu’une décennie plus tard, celui-là n’est toujours pas un cornichon.
rubberduckvba.ca
Le site historique du projet rubberduckvba.comredirige désormais vers rubberduckvba.ca et le dépôt du projet Rubberduck sur GitHub est maintenant archivé en lecture seule. Les efforts de développement pour la prochaine évolution sont en cours dans un dépôt pour l’instant privé sous la même organisation rubberduck-vba; Rubberduck Core en sera bientôt le nouveau projet-phare en mode Open-Core, soutenu par 9562-7303 Québec inc., une société privée fondée à cet effet par le même auteur principal de Rubberduck et auteur de ce blogue depuis son commencement.
Être incorporé au Québec signifie que toutes les communications officielles seront publiées dans ce format en français d’abord, avec un lien immédiat vers le contenu équivalent en anglais. Ça signifie également que la disponibilité du contenu dans une langue autre que l’anglais n’est pas un ajout, mais une nécessité : tout comme Rubberduck, Rubberduck Core (ou RDCore pour faire plus court) sera assurément disponible en français et en anglais dès le jour un, et ensuite dans toutes les langues que la communauté rendra disponibles. Ce n’est pas un fardeau, mais une opportunité. Vos documents seront toujours envoyés dans la langue de votre choix.
(C) 2026 Mathieu Guindon pour 9562-7303 Québec inc.
English
Long Live the Cucumber
May 26, 2026 will mark the 10th anniversary of the discovery by core historical contributor @Comintern of this cryptic message at resource key 18089 of the VBE7INTL.DLL library:
STRINGTABLE
LANGUAGE LANG_ENGLISH, SUBLANG_ENGLISH_US
{
 18080, "Tile Horizontally"
 18081, "Tile Vertically"
 18082, "Arrange Icons"
 18083, "Microsoft Visual Basic for Applications Help Topics"
 18084, "Search Reference Index..."
 18085, "Obtaining Technical Support"
 18088, "About Microsoft Visual Basic for Applications..."
 18089, "Long Live the Cucumber"
 18090, "Break On All"
 18091, "Break In Ole Server"
 18092, "Break On Unhandled"
}
The Rubberduck project always wanted to appropriate this phrase and use it somewhere, somehow.
Rubberduck Core marinates the cucumber and makes the quote its catchphrase, coined in Latin:
Carved in stone, Latin VIVAT CUCUMIS reads like some ancient prophecy.
There are a few layers to this imagery: let’s dive.
Carved in Stone
When we say something is carved in stone, we are describing something that is either immutable, or isn’t about to change – much like the specifications of a certain programming language.
Carved stone evokes Antiquity and Renaissance, but also cemeteries and headstones, like where you would expect to find a dead language like Latin… or VBA. It says “this has been around for a long time”, and also “this is part of our heritage”
Stone is rock solid, foundational, noble. It’s also heavy, and it can be a burden, like legacy code – or if we ask Microsoft, like runtime support for VBA. It nevertheless still says “this will be around for a long time”.
VBA is Dead, Long Live VBA!
Maybe “the cucumber” really did refer to Visual Basic itself, but it wouldn’t matter if it didn’t: VBA lived on, so the shoe fits even if a posteriori.
Using something that can be construed as a headstone to depict something related to VBA leans heavily onto its “unkillable” nature and the profound irony of it surviving every single one of its successive replacement attempts: VBA is dead, long live VBA!
Modernization
Rubberduck Core keeps the roots and evolves the concept, and so we will eventually grow out of stone, to metal – to steel:
Laser-engraved on a steel medallion, the same words become a tribute, a promise, a fulfillment, a… keychain, perhaps.
Steel is still the stone, in a way – crushed and cooked (narrator: fully separated from it, actually), but it came from the stone. Crude, heavy and unwieldy, it ultimately becomes refined, elegant and polished, relatively lightweight but extremely solid and reliable. And shiny. The soul is still there.
That’s exactly what’s going to happen with Rubberduck – the cucumber is only marinating a little longer… because a decade later, this one still hasn’t pickled yet.
rubberduckvba.ca
The historical project site rubberduckvba.com is now redirecting to rubberduckvba.ca and the Rubberduck repository on GitHub is now archived/read-only. Development efforts towards the next evolution are currently in progress in a private repository under the same rubberduck-vbaorganization; Rubberduck Core will soon be its flagship Open-Coreproject under 9562-7303 Québec inc., a private company founded for this specific purpose by the same primary author of Rubberduck and of this blog since its inception.
Being incorporated in Québec means all public communications are going to be issued in a French-first format, with an immediate link to the English content. It also means that localization isn’t an afterthought in this company, but a necessity: like Rubberduck before it, Rubberduck Core (or RDCore for short) shall be assuredly available in both French and English, and then every language it would end up being translated into. It’s not a burden, but an opportunity. Your documents will always be emailed in the language of your choosing.
(C) 2026 Mathieu Guindon on behalf of 9562-7303 Québec inc.
I know it’s been forever, trust me… I know. But life happens as they say, and here we are a whole year and over 20,000 downloads later with some movement at last in the Rubberduck repository.
Also… Rubberduck is now officially a whole 10 years old! It’s completely incredible how far we’ve pushed this project, and I’m very proud of everything we did, undid, redid. The number of times we’ve collectively crashed the VBIDE together must overflow an Integer by now!
Development on the project started late in 2014, but the website and blog only did in early 2015, with the initial release of what was then not much more than an extension of a thought experiment.
The “official” 2.5.92 release will come later once it’s been out in the wild a little as a pre-release, but the announcement will refer to this present article for what’s new.
The broken website did not like having the new tag records inserted for some reason, but the fallback links point to the right place so it’s still relatively easy to find the installer download; you’ll find the executable listed under the assets of the latest release/tag on GitHub:
A handful of new inspections are being introduced once again, this time around Option Base 1 and a little pet peeve of mine with Excel-specific code.
Parameterless Cells
As you know, in the Excel library Range.Cells is a parameterized get-only property that accepts a row or column index, or both, …or neither. Except when it’s not parameterized, it’ll just return exactly the parent Range object reference, making it an entirely superfluous member call. This new Excel-specific inspection will flag these parameterless calls. A quickfix could be implemented to automatically remove these calls, but flagging them as redundant is a good first step:
Public Sub DoSomething()
    Debug.Print Sheet1.Range("A1").Cells.Address '<<< inspection result here
End Sub
UPDATE 2025-02-01: Properly implementing this inspection requires more careful consideration that make it difficult to avoid false positives in the few specific situations where a parameterless Cells call does, actually, return different references depending on what other Range members were called before – this kind of tracking isn’t quite possible with v2.x, unfortunately. So this inspection isn’t making it to release, it’s been removed already.
When Option Base 1 is specified, implicitly sized arrays begin at index 1 instead of the more typical 0. However, ParamArray arrays will always be zero-based regardless of Option Base. Similarly, explicitly qualified VBA.Array function calls will also systematically yield a zero-based array. This new inspection flags these parameters and function calls as having a base that is inconsistent with the Option Base setting of the module. There’s no fix for this one either, it’s just a hint that could potentially help detect off-by-one errors.
Option Base 1
Public Sub DoSomething()
    Dim Values As Variant
    Values = Array(42)
    Debug.Print LBound(Values) '<~ 1 as per Option Base

    Values = VBA.Array(42) '<<< inspection result here
    Debug.Print LBound(Values) '<~ not 1
End Sub
Another example:
Option Base 1
Public Sub DoSomething(ParamArray Values) '<<< inspection result here
    Debug.Print LBound(Values) '<~ not 1
End Sub
Rebalanced Inspection Defaults
For a while now, something had been bugging me about the inspection types and default severities: things tended to stick to the default fallbacks over time, and the categorization of a number of inspections felt wrong and overall unbalanced. Because inspection types are for legacy reasons part of the inspection configuration, if yours isn’t the default configuration you will not see an effect until you either reset everything to defaults, or manually edit the configuration file to remove everything about inspections.
Here’s the breakdown of how things were shuffled around with inspection types:
Inspection Type
v2.5.91
v2.5.92
Code Quality
73
60
Language Opportunities
23
21
Naming and Conventions
19
28
Rubberduck Opportunities
3
12
Total
118
121
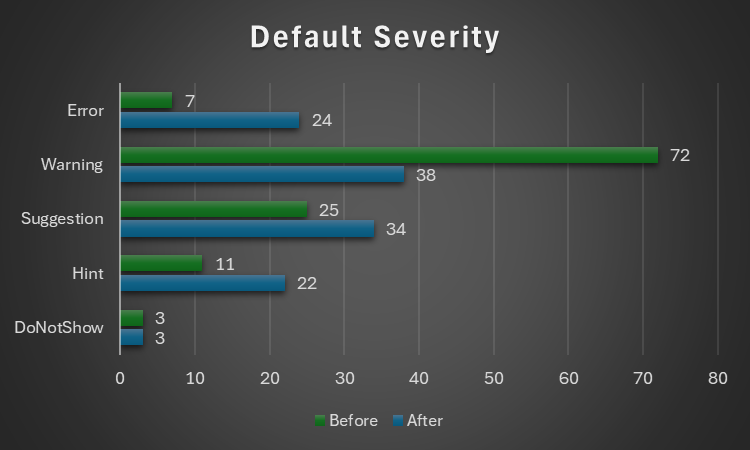
..and with the default severity levels:
Default Severity
v2.5.91
v2.5.92
DoNotShow
3
3
Hint
11
22
Suggestion
25
34
Warning
72
38
Error
7
24
Total
118
121
Notably, everything around annotations is now under Rubberduck Opportunities, and default severity levels are much more sensible; the 3 inspections disabled by default remain disabled:
RedundantByRef mirrors ImplicitByRef; both are valid takes, just different conventions and the more explicit one was made the default, but you can reconfigure them to match your style by enabling one and disabling the other.
StepIsNotSpecified mirrors RedundantStepOne; again both valid stances, this time with the less noisy one as the default configuration.
ShadowedDeclaration was disabled for performance reasons, if I recall correctly. Or it’s something about some difficult false negative situations making it somewhat too unreliable or experimental to ship enabled by default.
This clean-up touched every single inspection, and in the process the way to localize the resources has been standardized, which should fix the annoying partly-localized labels in some inspection results.
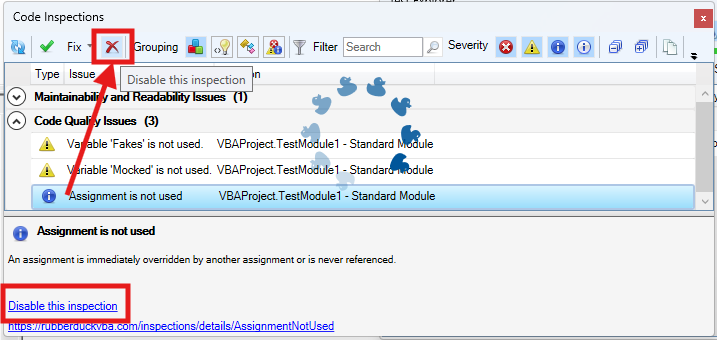
The inspection results toolwindow gets a new disable this inspection button right next to the Fix menu, which should make it easier to disable an inspection altogether with a single click, by selecting any of its results in the grid.
The “disable inspection” command remains available as a link/button in the bottom panel, but now also as a more prominently visible button on the main toolbar. Note that there is no confirmation prompt for this actionfor now.
Unit Testing
This is a very, very exciting release for the unit testing feature!
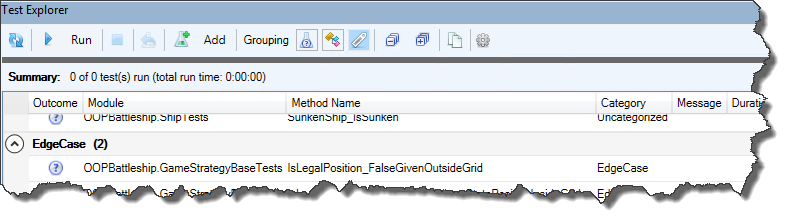
Performance Enhancements
Keeping the Test Explorer UI updated with a constantly changing source collection was taking a serious toll on the UI thread, incidentally the only one available for running VBA code. Thanks to a quick PR by contributor tommy9, the explorer now leverages WPF features that improve the situation.
Projects with a lot of tests can still significantly speed up their execution by hiding the toolwindow and selecting Run all tests from the Rubberduck menu. If the main thread isn’t busy drawing a UI element, it’s free to run the instructions of a test procedure.
Moq+VBA
Seven long years after the initial pull request was opened, it’s finally merged and ready to start a little revolution in the VBA unit testing world.
There are important limitations: user code cannot be mocked after it’s been modified, and the setup of ByRef parameters may not always work correctly, but the bulk of it is close enough (and has been for a long time) to be release-worthy. Part of what took so long was that we wanted to ship the full feature working exactly as intended, but there are some serious technical roadblocks and between entirely dropping a 7 years old pull request and merging it anyway, … I’m going with the merge. Perfect is the enemy of good, they say.
What’s happening here is nothing short of pure wizardry: we’re turning arbitrary COM objects into .net ones, and then we translate configuration calls written in VBA into .net expressions that literally get compiled and invoked on the fly to call the non-generic methods offered by Moq 4.8 (getting a bit old, but we’ve never had anything like this in VBA).
In other words, unit testing with Rubberduck now empowers you with quite a large part of what only becomes possible with a real mocking framework, which this is.
The mocking API is currently documented in the wiki, but here’s the crux of it… it’s a game changer:
    'arrange
    Dim Mock As Rubberduck.ComMock
    Set Mock = Mocks.Mock("Excel.Application") 'here we create a new mock using the Excel.Application progid
    'then we configure our mock as per our needs...
    Mock.SetupWithReturns "Name", "Mocked-Excel"
    Mock.SetupWithCallback "CalculateFull", AddressOf OnAppCalculate
    Dim Mocked As Excel.Application
    Set Mocked = Mock.Object 'ComMock.Object represents the mocked object and always implements the COM interface it's mocking
    'act
    'just making sure the mock works 🙂
    Debug.Print Mocked.Name
    Mocked.CalculateFull
    'assert
    'use the ComMock.Verify method to fail the test if a method that was setup was not invoked as per the test's specifications:
    Mock.Verify "CalculateFull", Mocks.Times.AtLeastOnce
There’s only a handful of simple objects to work with, and the API is clean, unambiguous, intuitive. The example above illustrates the enormous power that’s now in your hands by mocking the Excel.Application interface.
The COM mock lets you access the proxy object to pass it around as a surrogate implementation for a dependency that would otherwise compromise the “unit” part of it being a “unit test”; it’s a class type that’s spawned into existence from its definition, for which you can setup any member call in a test. Here we make the `Name` property return a different value just because we can, and when the macro invokes the `CalculateFull` method against this mock instance, rather than awaiting a full application-level compute you can simply verify that the method was invoked, or run a callback procedure (elegantly passing it to the API with the `AddressOf` operator) that can be parameterized if you need to accordingly alter some state.
I’ll write a whole article dedicated to this API soon, but together with the Fakes API, this really takes the Rubberduck unit testing feature to the next level (code coverage would be the next one). As long as you can identify the dependencies in your code (and come up with a way to inject them from the caller), you can now write a test that abstracts them away.
Other Tweaks
The Unassigned variable usage inspection will now honor the out prefix by convention, meaning it will no longer issue false positives when a variable is assigned by another procedure via a ByRef argument, as long as it’s named accordingly with an “out” prefix.
The About box will now mention “Win11” for Windows builds above 22000, even though the major version says 10. This was likely related to Rubberduck using an ancient .net Framework API to retrieve this OS version information.
Renaming an enum member in a way that requires the constant to be qualified, will now correctly use the enum type name rather than the name of the containing module, which was an edge case that could cause headaches and break the code.
What about v3?
If things had gone smoothly, you would know by now. They obviously haven’t, and not much has moved on that front since last May or so. I’m not abandoning the project, but building an entire editor client and a language server is honestly much more than I can chew at the moment, for multiple reasons… twinBASIC is coming, and while a commercial offering, it’s a VB6/VBA language server and compiler, and it reckons the whole editor part is already a solved problem. Rubberduck 3.0 was going to reinvent that wheel, which would have been a huge distraction.
So RD3 is going to be re-scoped a bit: the planned VBIDE integration / add-in part remains of course, but instead of making an entire editor from scratch, we’ll integrate into an existing, modern one that’s already an extensible LSP (Language Server Protocol) client, much like Visual Studio Code (but no, it’s not going to be VS Code). This instantly knocks off (well, removes outright) a gigantic, milestone.
With this v2.x release, the backlog of pending pull requests is finally cleared. 950+ open issues remain in the Rubberduck repository, but very few are actual unresolved bugs or realistically implementable feature ideas. Expect additional pull requests for missing translations, minor fixes and UI/UX enhancements, but the 2.x life cycle is now essentially completed… and it was about time: the technology used for building Rubberduck has evolved a lot in the last decade, with much of it either deprecated, or on the brink of falling out of official long-term support from Microsoft, which is making it harder and harder to easily and successfully build Rubberduck, hoping with fingers crossed that nothing breaks at every dependency update.
I bet VBA will outlive .NET Framework 4.8.1 LTS, which is non-ironically very funny to me… but for Rubberduck to keep moving forward, making the move from the now ancient .NET Framework over to current technology is inevitable – and development on v3 has already knocked that critical milestone, too.
Afterthoughts
I want to stop spreading too thin and actually finish the website now (as you can see, …the thing is falling apart!), and then with Rubberduck 2.x in its current state (more or less), I can finally draw a line and know exactly what v3.0 needs to be. My priorities have shifted quite much since 2021 for many reasons, and Rubberduck and the blog and my online presence in general basically had to hit the brakes. Life happens… doesn’t it.
I’ll always write code as a hobby, as I’ve done ever since I found out about programming. But I also played (badly) some guitar as a teen, and carried a few harmonicas with me to the Microsoft MVP Global Summit in 2018 and 2019 (the two I attended before they went virtual during the pandemic); these days I feel like I could write about the music theory I’ve learned since, or perhaps how to configure the reed gaps on a 10-hole diatonic, standard Richter-tuned harmonica to make it easy to play the hidden overblow notes. I haven’t been paid to maintain a line of VBA code for a very long time now, and I’ll always love it but I can’t say it’s my GoTo language anymore, but it’s all right – Rubberduck isn’t written in VBA anyway. But it’s becoming hard to find inspiration to write about some random VBA things, especially since I’ve stopped participating on Stack Overflow. I stopped, because they basically made an agreement with OpenAI and essentially stole (with a unilateral move in violation of the agreed-upon license) the volunteer work and helpful knowledge-dumps of tens of thousands of people (myself included) to train a… chatbot and make billions off of these people’s work, and then take art and reduce it a prompt.
I mean I get it, it’s fun. But it’s a very steep cost just for something that’s just innocent fun.This is the first and last AI-generated image you’ll ever see from me on this blog.
Perhaps I’m just turning into an old man screaming at a cloud (brought to you by AWS!), but… look, it doesn’t matter that you can prompt a machine to play some harmonica for you: you’ll never, ever, ever experience any AI-generated slop like when you’re actually playing the blues and counting that I-IV-V progression over these 12 bars. Same on guitar. Same on drums. Same with code.
Release 2.5.9 came with an unfortunate bug where an exception in the version check feature would blow everything up and fail the startup of the add-in. It was of course quickly fixed in a subsequent pre-release build, and meanwhile other enhancements have been merged, so here we are with a new release that fixes the error handling of the version check service and correctly parses empty instructions.
One parser bug was reported through an interesting edge case that was reminiscent of good old ThunderCode, looking something like this:
If condition Then:::::::::::DoSomething
It is of course grammatically correct, which means Rubberduck should be able to ingest it. Thanks to yet another contribution by @MDoerner this version correctly parses such empty instructions, which feels like it opens up an opportunity for an inspection that flags them, and a quick fix to remove them.
This parser tweak is definitely making it to RD3!
Other Hacktoberfest contributions include:
Correctly replacing any Exit Sub with Exit Function statements when converting a Sub procedure into a Function.
Fixing an unsafe conversion from Char to Int that was causing a crash in PowerPoint 2019.
COM Interop / RCW handling solidifying shutdown by taking measures to ensure reading or writing a CommandBarButton’s caption or enabled state does not happen during shutdown / after the COM objects have been destroyed.
Allowing multiple line continuations before the dot operator in member access expressions.
Version Check Bug
That one is purely on me rushing to release without realizing that the web API call wasn’t surrounded by a try/catch block, and since it was an asynchronous operation… any uncaught exception would take down the host process, which is utterly uncool.
The fix was, obviously, to handle errors around the network I/O. Of course a simple work-around was to simply disable the version check on startup, but unless you’re familiar with Rubberduck configurations, tweaking these without being able to load Rubberduck in the VBE to bring up the settings dialog wasn’t exactly a user-friendly experience.
Note: the web API that refreshes the website and responds to version check requests is still down! I’ve manually inserted the database records for this release, so it shows up on the website.
Extract Method
There’s an off-by-one selection glitch with this refactoring that’s also getting fixed in this release, thanks to a timely contribution by @tommy9. This selection glitch was disabling the refactoring command when it shouldn’t be disabled, making it more difficult to use than it should be.
RD3 Progress
Meanwhile I’ve been giving quite a bit of love to v3, working on the new settings model and UI. I needed to get settings out of the way early on, because everything wants to access the configuration settings, including the locations of the server executables: I got to a point where hard-coding these was no longer practical, and since debug builds don’t generate the assemblies in a single “install folder”, being able to point them to local debug builds was a good excuse to get the settings model under way.
Data Driven UI
Historically in Rubberduck, adding a new setting meant adding a property to one of the setting groups, crafting a dedicated UI section for it in the settings UI, and then editing a .XML configuration file to define the defaults. All this work means adding a new setting is a whole undertaking in its own right, and that’s essentially a deterrent to liberally sprinkling configurable options any time we come across a decision and go “hey it would be nice if this was configurable!”.
RD3 treats settings at a different abstraction level: instead of having a “GeneralSettings” class with a property for each setting, we go meta and now GeneralSettings is becoming a settings group, and the individual settings are becoming record type instances, where each setting has a name, a description, a data type, default and current values, and additional metadata to identify hidden settings that should not appear in the dialog (e.g. the flag indicating whether Rubberduck prompted to import legacy indenter settings), or settings that are recommended to keep their default value (e.g. server executables’ locations).
Because there are settings of pretty much every data type, templating the settings UI before everything else means everything else gets to use already-templated controls, resulting in a consistent UI that looks and behaves the same across the entire application.
The still-WIP RD3 settings dialog showing some language client settings.
Unless it’s for a new data type that wasn’t already templated, adding a new setting in RD3 means adding a new record class for the setting, defining its default value and metadata in the same place, and then adding an instance to an existing setting group – and that’s all there is to it… well, excluding the associated string resources, each of which will need translations (most of this doesn’t exist in RD2).
Language Server Protocol
The VBE addin itself is implementing a LSP client, but its server is going to be the Rubberduck Editor process: the editor will be notifying the addin whenever it needs to synchronize source files into the VBE. In other words the editor is both a server and a client, depending on whether it’s talking to the addin or to the language server.
At this stage the addin is initializing a language client when it launches the editor, and as soon as the editor completes the LSP initialization handshake with the addin, it starts the language server process and initializes its own language client.
While both the addin and the editor implement LSP initialization, the two processes have vastly different responsibilities: the addin doesn’t deal with documents, and doesn’t care about semantic tokens or diagnostics: its primary responsibility is to get the code files into and out of the hosted VBA project, and provide an insulation layer between COM and the rest of Rubberduck. The editor however, is going to implement most of the LSP-defined features.
All Json-RPC communications are happening across process standard I/O for now, but this isn’t viable because when the editor talks to the addin, it needs to do so in a channel that’s separate from when it talks to the language server (things could get really funky otherwise). Named pipes will solve this, but in order to keep things moving forward I’ve opted to leave the addin behind (it’s almost completed!) and build the editor as a standalone application (which greatly simplifies debugging). We’ll get the named pipes working to implement the synchronization with the VBE, but the VBE is otherwise not needed for now, so standard I/O it is, and we’ll look into named pipes when they’re needed.
Project Templates
As I was piecing together everything I needed to serialize the .rdproj file and initialize a workspace, I came across the need to create a blank project that references the VBA library… and as I was hard-coding this sensible default I realized I could just copy an existing project file instead of hard-coding it, and things snowballed from there a bit, and so RD3 will come with a default empty project that references the VBA library, but also templates for various Microsoft Office hosts, and then why not have a template for a host-agnostic MVP project!
In Visual Studio when you start a new ASP.NET MVC project, you get a bare-bones working application that’s already somewhat organized, with the source files under specialized folders; the RD3 Rubberduck Editor will be able to do the same.
Creating a new project in the Rubberduck Editor lets you pick a project template and not start from scratch every time.
Templates are just special folders with folders and code files; all the folders under the Templates folder are considered project templates!
Project/workspace files solve the problem of “remembering” which files were opened, so it should be easy to restore them – the same feature is how template projects will open in the editor with the README.md document tab opened.
Folders
Making VBA code as git-friendly as possible is, I believe, one of the best ways to ensure VBA lives on; being able to organize a VBA project into actual folders is an important part of this, but the lack of namespaces makes it a challenge… that’s solved with the .rdproj file. Indeed, it makes a way to ensure no RD3 project can have two source files that result in importing a module into the VBE… and then overwriting it when importing the next source file.
Taking RD2 @Folder annotations as a baseline, the relationship between modules and folders is reversed in RD3: RD2 folders were just a representation of where modules fit in a tree, folders could only exist if there was a module to define it. Now that we’re moving to the file system, a project can have empty folders, and modules don’t (can’t) have a say on what folder they live under.
This poses a compatibility problem with RD2 projects, that we’re going to address by acknowledging the RD2 annotations and migrating the project to the RD3 paradigm by creating actual folders under the project workspace, and moving the source files there; the @Folder annotation comments should then be removed. This functionality is not implemented yet despite the “new project” command being completed, because it’s the language server that will tell the editor about this when it starts issuing diagnostics… and we’re not there yet.
Forward
Rubberduck 3.0 can now create a new project, load an existing one, and save workspace changes to the file system. Loading a workspace/project loads all the file contents in memory in the editor process, and that’s where we’re at: the next step is to come up with a UI to explore the files in a workspace and pick one or more to actually open in an editor tab. This workspace explorer UI is similar to the VBE’s project explorer in that it knows everything there is to know about what files are in a project, and what content is in each file… but unlike the RD2 code explorer it knows nothing about any semantics, so it doesn’t/can’t drill down to member level – it’s really all about files and folders.
Once the Workspace Explorer UI is done, I’ll be focusing on the editor shell UI again, this time to work on the docking panels and document tab system: then we’ll have the infrastructure in place to add all the toolwindows we need, and document tabs that – finally – actually display file contents… whether that’s a markdown document, a plain text file, or a VBA source file.
Opening a workspace has implications with the LSP server: when you open a project in the editor, it sends everything it knows about these files to the server process through Json-RPC communications – the server process never accesses the files directly; files “belong to” the editor process.
Things were moving pretty fast with the prototype, but moving on to the actual LSP-driven project hit a roadblock as far as actually achieving the cross-process JsonRPC communications. I put it aside for a while, hoping to get back to it later, and then summer arrived and real-life stuff kept me busy. Renovations in Rubberduck, renovations at home.
Wow time flies, pretty much six months have elapsed since the last status update, and now it’s Hacktoberfest again already! So what happened?
RPC Issues
For about five of those six months, not much moved forward, but ideas kept brewing all along, and the RPC issues have now been resolved.
So, where’s RD3 at?
Clean Start, Clean Exit
When the VBE loads RD3, the add-in starts a separate language server process and connects to it through the language server protocol (LSP), using the very same technology that Microsoft put in VSCode, via the OmniSharp libraries. When the add-in is unloaded from the VBE (whether manually or as the host application shuts down), the server receives both Shutdown and Exit notifications, and once they’re handled and the server actually shuts down we’ll be left with a clean exit every time.
Logging is implemented on both client and server sides, and while debugging the startup and initialization was a bit painful (can’t start the server from Visual Studio, and can’t hook up the debugger quickly enough to attach in time to see what’s going on), now that it’s done the server process can be attached after it starts, so we can hit breakpoints in the server code.
Net7
Perhaps the biggest achievement is that RD3 is now building with .net 7.0, save for a specific library that has to target Framework 4.8.1 because of its use of a number of COM-marshaling methods that don’t (yet?) exist in .net core: that’s the parts dealing with unmanaged memory and pointer magic, that allow RD2 to run unit tests, among other things.
Because everything else is under .net7, Rubberduck gets to leverage all the amazing enhancements that have been brought to the C# language and development platform in the past, uh, decade or so. RD3 will likely release under .net8, which has long-term support from Microsoft.
There’s a catch though: this means RD3 will not be able to run on old, officially unsupported versions of Windows – we’re forfeiting them, in favor of being able to leverage the many enhancements being made to the .net platform. At this stage it’s still unclear exactly what this means for VB6 support: for now the focus is integrating with the VBIDE in VBA, but nothing says VB6 support is being ditched – it was just simpler to exclude that one RD library from the solution for now.
Settings
One of the first pieces of Rubberduck written around this time back in 2014 – the settings I/O and modeling – has officially been axed at long last. Since forever, Rubberduck settings have been serialized to an XML configuration file. In RD3 that’s changing to JSON and much simplified abstractions. In RD2 the default settings live in an XML-encoded “Settings.settings” file that’s a pure nightmare to maintain; in RD3 defaults are moving back into the code itself (I know, it’s data, not code per se), with each serializable struct implementing a generic IDefaultSettingsProvider interface that mandates the presence of a “Default” member that returns a static instance of that settings struct (e.g. LanguageServerSettings.Default, returns a LanguageServerSettings instance with the hard-coded default values.
JSON settings is how pretty much everyone else does it, and there’s a reason for that: the format is much easier to read and manually edit. Plus we already have JSON involved with the RPC messages between client and server. XML was originally adopted because that was the format for Visual Studio’s own settings and configuration under .net Framework 4.x.. and today it’s JSON everywhere.
Rubberduck Editor
Last spring the prototype editor was being integrated into the VBE using essentially the same mechanics used in RD2 for the dockable toolwindows, just undocked and basically turned into just another VBIDE document window.
With the project now under .net7, it turns out we can now have actual WPF/XAML windows in Rubberduck, so there is no more need to implement the entire UI as user controls that are embedded inside a WinForms user control that gets injected into a native toolwindow.
The RD3 editor will let go of most of the native VBIDE integration, and live in a separate window – very much like the Power Query Editor in Excel. The only native UI components in RD3 are the Rubberduck menu items, which have been boiled down to just “Show Editor” and “About” commands, both of which will now bring up a fully WPF UI, rather than a WPF UI embedded in a WinForms dialog: the Rubberduck Editor will be its own application, and we’ll have full control over everything that happens inside that editor.
The downside (if it is one), is that we have to implement basic commands such as Copy and Paste, as well as toolwindows we take for granted, like Properties and Object Browser.
At this stage the editor shell is able to display tab documents bound to a ViewModel; tabs can be moved around, torn from the main window and dragged to another monitor, or docked inside the editor shell. I’m now working on figuring out how the toolwindows are going to work; I’d like something similar to Visual Studio, but the Dragablz library would need to be forked and updated with such capabilities… the “toolwindows” aren’t docking and don’t work in a way that would make sense in a code editor.
Workflow
This does impact the VBA dev workflow: in RD2 the single source of truth was the VBE. In RD3 that’s no longer the case, since the VBE isn’t going to contain the code that’s being edited. The single source of truth in RD3 is going to be moving to the Rubberduck Editor, and the editor will be working off code files exported to file system folders, dubbed “workspace folders”.
When the Debug/Run command is executed, the RDE will save all modified documents to the workspace, synchronize the host VBA project components to mirror it, and then the VBE takes over from that point on (RDE window will minimize itself) to compile and actually run/debug the project.
The host VBA project can also be synchronized any time you want, using the File/Synchronize command – and the editor will run a FileSystemWatcher on workspace folders, so it will detect any external changes/additions/deletions, and immediately notify the language server. If external changes are detected on a file that is opened in the editor, it will prompt to either reload the document, or keep the editor version if it has unsaved changes (thus discarding the external changes).
In RD2 you had to manually tell Rubberduck about changes occurring in the VBE, because automatically parsing on idle involved low-level keyboard hooks and since these hooks were already involved in auto completion and hotkeys, it was deemed too invasive, and ran against the basic premise of the parser, which is that we’re operating with legal, compilable code.
This all changes dramatically in RD3. Because the editor is fully managed, nothing happens in it without the language server receiving requests and notifications. Content changes synchronize in real-time, the editor receives responses with completion lists, syntax errors to highlight (squiggles!), or edits (e.g. auto-formatting etc.) made server-side that the editor immediately carries into the code pane as you type – exactly like how Visual Studio and VSCode and any other modern-day code editor that works with a language server.
The server works asynchronously and out of process, so long-running tasks can send progress notifications, and even partial responses – for example a completion list might only include names to render the list in the client, and the associated tooltips and commands might be sent a few milliseconds later.
Debugging
As was mentioned before, the one thing the RDE cannot do, is attach as a debugger to your running VBA code. When you debug, the RDE will minimize itself and leave the VBE in charge. Edit-and-continue poses a particular challenge: after a debug session, the RDE doesn’t know if anything was modified in the VBE, and its file system watchers cannot help because code doesn’t just magically export itself back to the workspace folders – so here’s what we’re looking at:
When a debug session is launched from the RDE, code gets synchronized into the VBE before it is compiled and executed;
If the RDE is re-focused and the VBE is back into edit mode (i.e. debug session has ended), the entire workspace gets refreshed with a new export from the VBE;
If the RDE is re-focused during a debug session, document tabs will be read-only and the status bar will indicate why;
If the host application crashes, or the debug session does not end with the RDE being brought back before the host application shuts down, then the single source of truth resides safely in the host document and the workspace will synchronize next time the RDE loads this project;
Any edits made to the exported workspace files during a debug session would be overwritten and lost when the session ends and the RDE is re-focused, unless source control is involved and the changes were committed – in which case the modifications can then be recovered from source control.
Breakpoints cannot be set programmatically either, so the RDE will likely not support them. Bookmarks have a similar problem, in that the VBIDE API doesn’t really let us manipulate them, however the RDE can very well have its own bookmarks system. Debugger toolwindows (immediate, locals, call stack, etc.) are also not going to be present in the Rubberduck Editor, since they’d all be useless without a debugger attached.
User Interface
Some parts of RD2 XAML markup may survive, but really the intent is to make the RDE have a consistent, pleasing, modern, intuitive, and functional user interface for all of its functionalities. Because we’re no longer confined to a WinForms/native host, key/command bindings (hotkeys) will no longer require any kind of bug-prone hooking; focus should behave much more naturally as well, and drag-and-drop is going to be a breeze with the Dragablz library. RD3 basically entails crafting an entire IDE UI from scratch, starting with the editor shell.
The RDE window features a complete menu bar (largely inspired from Visual Studio’s), an actual status bar, and the client area consists of a Dockablz layout panel hosting a Dragablz document tab container.
Some more tinkering is still needed around toolwindows, because what we get out of the box with Dragablz is not going to work for our purposes. Perhaps there’s a way to split the left and right docking areas in two so there’s a distinct drop location for toolwindows that displays them with the tabs at the bottom, but for now there’s no such thing and toolwindows are essentially just another type of document tab.
Another thing that will need attention ideally before the entire UI is done, is theming: indeed it would be sad to make our own editor from scratch without supporting light, dark, and custom themes and syntax highlighting!
Server Side
The LSP server is in place, handling server lifecycle requests and notifications. The next step is to beef up the initialization to send the server information about the project(s) loaded in the VBE, including whether it’s an unsaved new blank project or an existing one hosted in a saved document, and a URI for each library reference so the server can load them and extract all the types and their respective members.
Then we’ll need to setup the actual workspace folders and parse any code files in them – and when we’re done doing that we can send the semantic tokens to the editor to perform syntax highlighting and folding ranges, all while the server starts running diagnostics/inspections, prioritizing the documents that are opened in the editor. The client-side code for this was written in the prototyping stage, so it’s not complete but exactly how that’s going to work is already all figured out.
2023.Q4
The last quarter of 2023 is likely to see lots of progress on all fronts: with LSP in place and a working but bare-bones editor, I can see myself focusing on UI work mostly, while other contributors hop on and work on server-side processing – much of which will have to be ported from the RD2 code base and reworked to fit the new paradigms.
There is a lot of work ahead, but with the client/server communications happening, things that have been on our minds for years, are about to get very real.
I intended to write about Rubberduck 3.0 progress last December, but things snowballed during the Holidays and here we are two-three weeks later and wow, time flies! Happy New Year dear readers (belatedly, I guess), 2023 is full of promises, and there are very nice things going on that I need to take a moment and share here.
Without any further ado, let’s clear the big news.
The main issues with Rubberduck have always been:
Memory consumption: Rubberduck consumes a lot of memory in the host process.
Instabilities related to COM interop: various tear-down issues with Office CommandBar and dockable toolwindows.
Poor VBIDE extensibility tooling and editor interactions.
Logs are difficult to use, it’s not clear what is happening in response to what – even when there’s only a single instance writing to the logs. Adding more logging means making things worse.
With v3 we’re addressing these long-standing issues by taking a number of design decisions early in the development process. These decisions were weighted against their downsides and alternatives, and probably make Rubberduck the first VBIDE add-in to implement a LSP Server for its purposes.
Language Server Protocol
For a while there have been discussions among Rubberduck devs about whether implementing LSP would be a feasible thing to do. It’s a protocol that formalizes all communications between a client (an IDE) and a language server that is used in modern IDEs such as Visual Studio and VSCode; twinBASIC implements it, and Rubberduck 3.0 will implement it too.
By moving all of the language-processing aspects out-of-process into a language server, we immediately tackle memory consumption issues: most of the CPU and memory resources Rubberduck 3.0 will use, are going to be outside of the add-in/host process.
With LSP in place, Rubberduck’s objective to bring editing VBA code in the Visual Basic Editor into the 21st century feels closer than ever.
SQLite
Rubberduck’s LSP implementation will be split in two processes, as the LSP server process will be a client for another server process that will host a SQLite database. SQLite is a lightweight library many applications on many platforms (including mobile!) use to persist data between sessions. The database is a local .db file, and the database engine runs in-process. Rubberduck 3.0 will host a SQLite instance in its own server process, and the LSP server process will communicate with it through JSON-RPC, the same way the add-in communicates with the LSP server.
Instead of keeping hundreds of thousands of objects in memory for quick lookups, Rubberduck will write these objects to the database, and only fetch what it needs to work, which should tremendously help reduce the memory and processing footprint of the add-in host process. Using it as a log target (instead of text files) could reduce in-process disk I/O… and replace it with socket I/O and work happening out-of-process.
Cross-Process Communication
The add-in project has no reference to the server project in the Rubberduck solution, and the calls aren’t late-bound either. What’s happening here is different, and there are implications: Remote Procedure Call (RPC) communications occur through web sockets (WS), using a port between 1024 and 5000. As a result, we need to have Windows Defender Firewall open that port for us:
A screenshot of the moment I knew the socket server worked.
Since everything is local, the port only needs private networks permission to operate. We use JsonRPC to send data through that port, so we’re streaming the bytes of human-readable, plain text JSON.
This new client/server architecture enforces a much more decoupled and robust solution.
Telemetry
Telemetry is considered a potentially controversial feature: it will be completely disabled by default and will have to be selectively opted-in explicitly, but with everything becoming asynchronous, trace logging alone often does not suffice for troubleshooting. By implementing a proper telemetry model, we’re giving ourselves the tools to track a request and all actions that stem from it, across the multiple processes.
Since the project started, the only usage data we ever had was our own biased anecdotal usage: we haven’t the slightest idea of what features are under-used, what features are clearly everyone’s favorites, what inspections are most commonly fired, what inspections are disabled, whether inspections we release disabled by default are ever enabled, etc.
Whether enabled or not, Rubberduck 3.0 will collect detailed telemetry data, and store it locally in the SQLite database, by default clearing any existing data on startup: vital debugging information is present if it’s needed.
Ok I’m opting-in, what gives?
Opting into telemetry will allow a Rubberduck client to automatically upload the telemetry data to a future endpoint on api.rubberduckvba.com (via https), where it will be persisted to a SQL Server database schema. Since there is no need for us to track any users, while still potentially extremely detailed, all telemetry data will be anonymous and impossible to track back to any particular user, computer, organization, or country. The transmitted telemetry data will only ever contain information that was explicitly allowed to be transmitted.
Time will tell how aggregated telemetry data can be used, but with enough data we (that includes you) could gain valuable insights on various points of interest:
Rubberduck feature usage statistics
LSP performance monitoring and troubleshooting
VBA language usage statistics, common issues
By transmitting some or all of your telemetry data, you’ll be helping make Rubberduck better for everyone, just by using it. However should you decide to not opt into it, we understand and respect your decision. Note that TraceTelemetry items are the trace logs, so transmitting them is exactly like sending us your log file for troubleshooting. I’ll make a separate post with all the details around pre-release time, and these features will be exhaustively documented on the website.
Progress?
Having the LSP and Telemetry models is one thing, actually implementing them is another. Last time I said I was going to be focusing primarily on the Rubberduck Editor UI, and I did for a while: the editor was progressing very well and I was making very conclusive tests with an in-process parser when I took the decision to move the parser out-of-process.
I proceeded to read the entire LSP specification and implemented a model for it. Shortly after, I realized that we were potentially going to be running multiple instances of a LSP server at once, and it dawned on me that having as many instances of the SQLite database loaded in memory was not going to be globally efficient… so I decided to pull the SQLite database into its own dedicated server process.
The whole exercise demanded a lot of movement in solution projects and namespaces, but I’m very happy with the results: everything is in its place, and the actual add-in project is pretty much empty!
I started with the server implementation that’s the furthest from the add-in: the SQLite database server. This server speaks to LSP through JSON-RPC, but while Language Server Protocol formalizes how the add-in and the LSP talk to each other, I don’t have such a formal protocol for communications between the LSP and the database… so I’m basing most of it on what I learned with LSP.
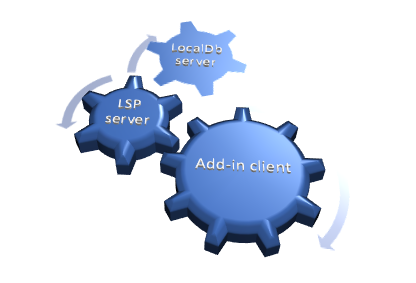
How it’s going to work: you start Excel and hit Alt+F11 to bring up the VBE. The Rubberduck add-in gets loaded and starts up, then starts a LSP server process and initializes it. In turn the LSP server starts, and attempts to locate the database server. If the database process isn’t found, the LSP server starts one. The Excel/VBE/Rubberduck client process owns the LSP server process, but nobody owns the database server: when the database has disconnected its last client, it automatically shuts down.
The servers (both database and LSP) are console applications that run silently as background processes. In order to facilitate configuring them, and viewing/reviewing their respective inputs and outputs, I’ve written a small client console application that shows the server console content, lets you easily export it to text files or copy it to the clipboard, etc.
Screenshot from before the DataServer UI was moved into its own LocalDbClient project.
The LSP client console application will have an additional Telemetry tab to review, delete, and manually submit telemetry data. Server log trace can be set to verbose or turned off, and the server itself can be instructed to shut down, directly from this application.
When RD3 releases, these client console applications will probably be accessible from an add-in menu, or perhaps they’ll be started together with the add-in and minimized to the system tray… we’ll cross that bridge when we get to the river.
Meanwhile work on the editor itself has taken a backseat, since it wasn’t useful to work on parameter info tooltips and wire up add-in functionality that would have to be later undone to work through the LSP server. All of the proof-of-concept stuff that worked, is still working. It just needs to be wired up to work with LSP requests and notifications, so focus has now shifted to the language server and its database backend.
The next few weeks/months are going to be all about implementing the LSP server, most likely.
Core contributor to the Rubberduck project, co-author of Microsoft Access in a Sharepoint World (2011), Professional Access 2013 Development (2013), and Effective SQL: 61 Specific Ways to Write Better SQL (2016), 10-times Microsoft Access MVP award recipient (2009-2019), Ben Clothier wrote a paper about class modules and OOP that makes a great on-topic addition to this blog. Enjoy!
Introduction
There are popular misconceptions surrounding VBA and object-oriented programming (OOP), usually in 2 forms:
VBA isn’t really OOP, so you can’t really use OOP principles with VBA
OOP makes things too complicated; procedural programming is all you need anyway
Both are incorrect because OOP is not a language feature but rather a principle of how we should design our code. In modern programming languages and IDE, there are features that makes it easier to apply & enforce the principles. In the end, it is still up to us, the programmers, to actually apply & enforce the principle. Thus, the language of choice has no bearing on whether you can apply the principles of OOP or not. If you are still skeptical, consider that the C programming language predated the development of OOP but there is a demonstration on writing OOP code in C.
The 2nd objection is commonly raised because when looking at the OOP code, it can seem frustrating because it refers to several other objects and you find yourselves looking at more files in order to see what a program does. Coming from a procedural mindset, that can feel like you’re dealing with several layers of lasagna. That does require a change in how you perceive the code.
That is the goal of this article, to help you discover how applying OOP principle can help you write better code, not just for VBA but for any programming language. If you’ve worked on a complex project, you might have had an episode where when you fixed a bug in one spot, 2 new bugs appeared in 2 unrelated places. Surely, you’d find that quite frustrating, taking out all the fun in the programming. Procedural design enables you to solve business problems quickly so that you can get on with other stuff. However, what if it’s so successful, that they come back for more; asking you for more features? How many changes do you have to make? With procedural programming, the upkeep is cumulative; first few feature requests are easy and put in action quickly. Next few, it takes more time and more tweaking. Some more, then it feels a bit harder and harder. But coding should not be like that! Adding a new feature should not scale on an exponential scale! That is what the OOP promises; by keeping a clean codebase, it is easy to describe the new feature and integrate it into the codebase with minimum change.
In fact, most programmers nowadays should be emphasizing writing refactor-friendly code. What do we mean by refactor-friendly? Basically, it is a codebase that is easy to change because you are able to change only pieces that actually needs to change and no more than that. That is very difficult to do in a purely procedural system. For long time, refactoring has not been something on average VBA developers’ mind because there were no tools to refactor VBA. Rubberduck exists to provide those tools. To get the most from refactoring, we do need to raise our level of code writing and apply good design to our VBA codebase.
The other important aspect to learn is that we want to make the wrong code look obviously and blatantly wrong. I highly encourage you to also read Joel Spolsky’s article on that subject. His article deals with the Hungarian notations, but we want to go beyond just the naming conventions. Taking up on OOP principles can significantly help us with making wrong code look wrong which means it becomes easier for us to fix the code. You’ve probably had to deal with a giant hundreds-line procedure with the great wall of declarations and deeply nested code and had the thrill of debugging it and cursing while your minor change cascades into something catastrophic. Well, there’s a better way!
The article assumes that you are familiar with VBA and procedural programming but otherwise have never or rarely used classes or interfaces. It further assumes that you might have had heard of object-oriented programming but otherwise are unfamiliar with the design and use of such. Also, it assumes that you are familiar and comfortable with using code-behinds and events in the document modules. (e.g. Excel’s workbook or worksheet, Access’ form or reports, Word’s document, etc.) We will build up on the class design and eventually apply OOP principles in designing our classes. To reinforce the concepts, we will do a build-up starting with familiar approach and transforming it into a clean codebase that is very refactor-friendly. The benefit is that you end up with a codebase that is easy to read, understand and maintain. Because this assumes you are familiar with procedural procedure (e.g. writing small functions or routines that perform a complex task by breaking it down into small steps), we need to provide a good transition from procedural mindset to object-oriented mindset. For that reason, we will take a route around the town instead of a direct route. I believe the indirect route will be beneficial in seeing what we would accomplish with a clean object-oriented codebase. This is not intended to be an exhaustive treatise but rather provide enough of fundamentals for you to see the advantages of the OOP principles in a VBA codebase.
We will start with creating custom types, and doing work with it, then use it as a basis for our first class.
Creating your custom types
You may have already used a user-defined type (UDT), which is a convenient way to create a structure of closely related properties together. You may have used it before especially if you’ve ever had to use certain API functions via the Declare statements. Let’s start with a Person UDT. We can create a new standard module and define a UDT within the module:
Public Type Person
  FirstName As String
  LastName As String
  BirthDate As Date
End Type
'figure 2-1: a Person UDT
The UDT provides us with 3 members that tells us something about a Person; namely the first & last name and the birth date. Obviously, we can have more but we want the example to stay simple. The calling code to use a Person UDT could look something like this:
Public Sub Test()
  Dim p1 As Person
  Dim p2 As Person

  p1.FirstName = "John"
  p1.LastName = "Smith"
  p1.BirthDate = #1970-01-01#

  p2.FirstName = "Jane"
  p2.LastName = "Doe"
  p2.BirthDate = #1970-01-01#

  Debug.Print VarPtr(p1), VarPtr(p2)
End Sub
'figure 2-2: testing code for using a Person UDT
This should demonstrate clearly that with a UDT, we could create several “instances”, which are independent of one other. Our setting of p2.FirstName does not affect the p1.FirstName. Note the last line printing out the VarPtr(p1) and VarPtr(p2). This prints out the variable’s memory address, which demonstrates that the p1 and p2 variables resides in a different region of memory and thus do not share anything. As an exercise, you can check the VarPtr for members of p1 and p2. For example, you could look at VarPtr(p1.FirstName) or VarPtr(p2.LastName) and compare to their respective counterpart.
In typical cases, we might want to have a collection of persons so that we can work with them in bulk or something similar. You might have done this but using a worksheet or a database table as the backing data structure. There is one crucial difference between a UDT and a database table or worksheet; the UDT is always ethereal, resides in the memory whereas the same data saved into a worksheet, a database table, or XML file are persisted and requires a specific method to read or write data to those source.
One thing about a UDT is that it cannot have any methods. We’ll start with creating a new person. In the above code example, we declared a Person variable for each object we needed, but we can do better than that. Let’s have a procedure that returns a new Person instead, as demonstrated below:
Public Function Create( _
  FirstName As String, _
  LastName As String, _
  BirthDate As Date _
) As Person
  Dim NewPerson As Person

  NewPerson.FirstName = FirstName
  NewPerson.LastName = LastName
  NewPerson.BirthDate = BirthDate

  Create = NewPerson
End Function
'figure 2-3: a Create function for a Person UDT
Now the calling code looks like this:
Public Sub Test()
  Dim p1 As Person
  Dim p2 As Person

  p1 = Create("John", "Smith", #1970-01-01#)
  p2 = Create("Jane", "Doe", #1970-01-01#)

  Debug.Print VarPtr(p1), VarPtr(p2)
End Sub
'figure 2-4: calling code using a Create function to create Person UDTs
Much more compact code, yes? More importantly, when we read the code, it is easy to understand what it is doing because we separate the mechanics of the creation from the current context which just needs something created without knowing the particular details in the act of creation.
But it doesn’t have to be just about the creation. Let’s say we want to provide name change. Perhaps because Ms. Doe got married and is now Mrs. Holly. We could then write a new function to help us:
Public Function ChangeLastName( _
  Person As Person, _
  NewLastName As String _
) As String
  ChangeLastName = Person.LastName
  Person.LastName = NewLastName
End Function
'figure 2-5: a ChangeLastName function to mutate a Person UDT
Thus, we could have our calling code do the name change:
Public Sub Test()
  Dim p1 As Person
  Dim p2 As Person

  p1 = Create("John", "Smith", #1970-01-01#)
  p2 = Create("Jane", "Doe", #1970-01-01#)

  Debug.Print VarPtr(p1), VarPtr(p2)

  Dim OldName As String
  OldName = ChangeLastName(p2, "Holly")

  Debug.Print OldName, p2.LastName
  Debug.Print VarPtr(p1), VarPtr(p2)
End Sub
'figure 2-6: calling code using ChangeLastName on a Person UDT.
The calling code demonstrates that when we change the last name for Ms. Doe to Mrs. Holly, the variable p2 is still the same; only its content has changed. If you are now wondering why we couldn’t have just assigned the UDT member directly instead of calling ChangeLastName, that’s exactly one of the problems we face with using UDTs:
p2.LastName = "Holly" 'Overwriting the original "Doe" entry
'figure 2-7: bypassing the ChangeLastName function by writing directly to the UDT member.
There is no way for us to control the access. VBA does not allow us to create an UDT that cannot be edited once created. That is often referred to being “immutable”. So, when we pass around UDT, we are always trusting that everyone will follow the same convention we build around the type. However, as human beings, we excel at being inconsistent and forgetful, so it’s too easy to fail to follow the convention, especially because the compiler won’t care whether you do a p2.LastName = "Holly" or ChangeLastName(p2, "Holly"). Both are legal syntax; but we don’t want it to be that way.
If you are wondering why we should want to control access and require use of a ChangeLastName instead, consider that in a typical business process, nothing stays the same for very long. What may have been true yesterday may be no longer true today. To stick to our example, we could suppose that we have a requirement that name change must be approved and is restricted to only those who are 18 years or older, based on the birth date. If we directly set the LastName property, there’s no guarantee that the checks have been enforced. We can write down a sticky note “Use ChangeLastName”, but that won’t be enforced by the compiler. One key to writing a clean code base is to have the compiler do as much work as possible in telling you that some certain action is verboten.
To recap what we’ve learned so far. We’ve seen how we can define a custom user-defined type to group a set of closely related properties. We saw that the UDT can be instantiated multiple times, enabling us to juggle more than one instances of same type at the same time. We wrote some procedures that interacts with the UDT to compensate for the shortcomings of the UDT such as making creation easy or managing some sensitive change such as changing person’s last name which may have additional constraints beyond just the code itself. We saw that an UDT does not really do a good job of managing the access to properties, which requires us to follow conventions that are not enforced by the compiler, which can make the coding around an UDT highly prone to errors or omissions.
Creating our first class module
With all that information we’ve learned, we now have enough working knowledge to start creating a class. Let’s get started by creating a new class module. We’ll call it “Person”. We create a class module via the VBIDE’s toolbar and choosing the Class Module command.
Figure 3-1: “Insert” dropdown menu from the VBIDE main toolbar
The very first thing we want to do with our first class is to define the private data it needs to have to work correctly. We could start with nothing but public fields, like this:
Public FirstName As String
Public LastName As String
Public BirthDate As Date
'figure 3-2: initial class design with fields only.
The class module is probably still unnamed and may have a default name of Class1. To provide it with a name, you can fill in the name via the Properties toolwindow:
Figure 3-3: Specifying a name for a newly created class module
However, this is no better than the original UDT we started with in Figure 2‑1. We would still have the same problem with controlling the access. For example, we might not want to allow arbitrary changes to LastName but rather control it via a dedicated ChangeLastName procedure. We could use Property statements instead. If you’ve never used one before, they are a way to provide a procedural access to a member of the data structure, which grants us additional control on how the property may be accessed. We could revise the code accordingly:
Private mFirstName As String
Private mLastName As String
Private mBirthDate As Date

Public Property Get FirstName() As String
  FirstName = mFirstName
End Property

Public Property Let FirstName(NewValue As String)
  mFirstName = FirstName
End Property

Public Property Get LastName() As String
  LastName = mLastName
End Property

Public Property Let LastName(NewValue As String)
  mLastName = LastName
End Property

Public Property Get BirthDate() As String
  BirthDate = mBirthDate
End Property

Public Property Let BirthDate(NewValue As String)
  mBirthDate = BirthDate
End Property
'figure 3-4: a class design using Property statements instead of public fields.
This is still functionally equivalent to the original version of class and the UDT; all members are readable & writable. However, because property is a procedure, we can add additional logic beyond just setting a field. A typical example might be to require validation such as the code in Figure 3‑5:
Public Property Let FirstName(NewValue As String)
  If Len(NewValue) = 0 Then
    Err.Raise 5, Description:="First name cannot be blank"
  Else
    mFirstName = NewValue
  End If
End Property
'figure 3-5: an example of a property procedure with validation enforced.
Note that we had to define 3 private fields (mFirstName, mLastName, and mBirthDate). We had to use prefixes because we don’t want name collisions with the public-facing properties of same name. However, this is problematic for two reasons:
All private fields are now sorted together in the IntelliSense, requiring you to type in a “m” to locate the module level field. This becomes annoying when you have other public members that might start with the letter “M” but will now mingle with those various backing fields. That hampers the discoverability of the code.
Because of intermingling, you can’t tell quickly whether a public member LastName has a backing field or not; you’d need to look in two different places to make that determination. While the examples above have shown us properties that provide data, we could create a get-only property that is calculated. For instance, we can create an Age property that is calculated based off the mBirthDate backing field rather than having its own mAge backing field.
We can do better! Let’s use a UDT instead of a bunch of fields. Since we are improving upon the original UDT, we will start with a UDT, but this time we’ll make it Private, and we will only need a single instance of it. We’ll also take the opportunity to make all properties read-only by not providing a Property Let like we did in the original example:
Private Type TPerson
  FirstName As String
  LastName As String
  BirthDate As Date
End Type
Private This As TPerson

Public Property Get FirstName() As String
  FirstName = This.FirstName
End Property

Public Property Get LastName() As String
  LastName = This.LastName
End Property

Public Property Get BirthDate() As String
  BirthDate = This.BirthDate
End Property
'figure 3-6: a class using an UDT as its backing field for several properties.
With this approach, we have only a single module-level variable, called This. This enables us to get a nicely filtered IntelliSense listing only the backing field, which can be now the same name as the public member and this is now much easier to enforce with compiler’s help.
This is obviously an improvement, but we now have no way of setting the data to the This instance. Let’s add a procedure to do just that:
Public Sub FillData( _
  FirstName As String, _
  LastName As String, _
  BirthDate As Date _
)
  If Len(This.FirstName) = 0 Then
    This.FirstName = FirstName
    This.LastName = LastName
    This.BirthDate = BirthDate
  End If
End Sub
'figure 3-7: a FillData procedure to write to the private data of the class.
Now we can create the persons with this revised calling code:
Public Sub Test()
  Dim p1 As Person
  Dim p2 As Person

  Set p1 = New Person
  Set p2 = New Person

  p1.FillData "John", "Smith", #1970-01-01#
  p2.FillData "Jane", "Doe", #1970-01-01#

  Debug.Print VarPtr(p1), VarPtr(p2)
End Sub
'figure 3-8: revised testing code using the Person class.
Hopefully this illustrates how much cleaner the code is. More importantly, because the fields in the class are now private and can be only set via the FillData method, and exposed as read-only, we make it possible to leverage the compiler to help us enforce guarantees about the access to those fields. That becomes important in a more complex class where we need to be able to make safe assumptions about the class’ internal state. We would not have that with an UDT.
We also have a validation check that This.FirstName is not already a zero-length string, and throwing a runtime error to prevent erroneous use of the FillData procedure. However, this is a runtime validation, rather than compile-time validation. We want the compiler to do the work for us.
Can we do that? Absolutely! We will look at how we can achieve this using interfaces next to help us hide the methods.
Controlling access to methods via interfaces
Above, you saw how we could use a class module to protect the internal data structure and thus control the access to the data, which helps us write code that we can verify at the compile time to do the correct thing. However, we still need to deal with the methods themselves. As noted, we needed to create a FillData method to write data to the internal state. As it is, it would expose the procedure to all consumers and there’s nothing preventing them from inappropriately calling it. We can use a runtime validation but the objective of this paper is to convert as much errors we can from run-time to compile-time. So we need to do something about the FillData method. We want to basically hide the FillData member once the instance has been created. How do we do that? With interfaces. What are interfaces in VBA? They’re actually just class modules. VBA does not actually make a semantic distinction between a class and interface. To further muddy the water, all VBA classes also have a default interface – that is, the class itself (i.e. its Public members). To keep it simple, we will say that an interface is basically a VBA class module with no code. Here’s how we will set up our IPerson interface:
Public Property Get FirstName() As String
End Property

Public Property Get LastName() As String
End Property

Public Property Get BirthDate() As String
End Property

Public Function ChangeLastName(NewLastName As String) As String
End Function
'figure 4-1: IPerson interface.
You might note that this has similar properties like we saw in Figure 3‑6, with the addition of a modified version of ChangeLastName we saw in Figure 2‑5. More importantly, the FillData method is not present on the IPerson interface. By itself, it does not do much because there is no implementation for the interface. We will now make the Person class implement the IPerson interface. This is done with the Implements statement:
Implements IPerson

Private Type TPerson
  FirstName As String
  LastName As String
  BirthDate As Date
End Type
Private This As TPerson

Private Property Get IPerson_FirstName() As String
  IPerson_FirstName = This.FirstName
End Property

Private Property Get IPerson_LastName() As String
  IPerson_LastName = This.LastName
End Property

Private Property Get IPerson_BirthDate() As String
  IPerson_BirthDate = This.BirthDate
End Property

Private Function IPerson_ChangeLastName(NewLastName As String) As String
  IPerson_ChangeLastName = This.LastName
  This.LastName = NewLastName
End Function

Public Sub FillData( _
  FirstName As String, _
  LastName As String, _
  BirthDate As Date _
)
  If Len(This.FirstName) = 0 Then
    This.FirstName = FirstName
    This.LastName = LastName
    This.BirthDate = BirthDate
  End If
End Sub
'figure 4-2: Person class implementing the IPerson interface.
If you compare the original class in figure 3‑6 with the code above, you should note the following differences:
The members are now Private rather than Public.
The members now have the prefix IPerson_. You might have seen similar setup with event handlers. Obviously this is special in the sense that if you have an IPerson variable, you are able to access the implementation even though it’s Private because the IPerson interface defines the member as Public (see figure 4‑1).
The FillData procedure is not on the IPerson interface, but is still Public and doesn’t have an IPerson_ prefix.
Let’s set up some testing code to demonstrate that we’ve in fact hidden the FillData procedure:
Public Sub Test()
  Dim p As Person
  Set p = New Person
  p.FillData "John", "Doe", #1970-01-01#

  Dim i As IPerson
  Set i = p 'We can assign a Person to IPerson because of Implements

  i.FillData "Invalid", "Invalid", #9999-12-31#
End Sub
'figure 4-3: testing code to demonstrate that FillData on a IPerson variable is disallowed at compile-time.
Once we’ve set up the code above, we should try to compile the code. This should yield a compile-time error, like this:
Figure 4-4: Compile error: method or data member not found.
This is an immense improvement over the original code from the Figure 3‑7, which would only be enforced at run-time, not at compile-time. By writing code that we can get the compiler to aid us in checking, we reduce the likelihood of introducing bugs due to an incorrect use of methods.
However, you might be wondering if we have to create a Person variable, what’s there to stop us from accidentally using a Person variable when we should be using an IPerson variable? Indeed, the testing code in figure 4‑3 is suboptimal. Ideally we would have a method that will provide us with an IPerson variable so that we don’t actually need to create the Person variable at all. Thus, we need to learn about creating a factory, and also learn about separation of concerns.
Factory Design Pattern
We saw how we can use interfaces to hide the methods that shouldn’t be available to consumers but we also saw that it does little good if we create the implementation then cast it in the same routine. We need to be able to separate the creation so that we will get the interface, rather than creating the implementation ourselves. By separating the two concerns, or the scope of work, we achieve cleaner code. To that end, we will need to create a factory. There are few different ways we can create a factory, with their pros and cons. Because this article intends to build up on the lessons we learned, we will start with the most simple possible way to implement a factory.
One way to create a factory in VBA is to create a standard module and treat it like a class. By using a standard module in this manner, we avoid the need to create an instance of the factory itself and keep things straightforward. Let’s create a PersonFactory module:
Public Function Create( _
  FirstName As String, _
  LastName As String, _
  BirthDate As Date _
) As IPerson
  Dim NewPerson As Person
  Set NewPerson = New Person
  NewPerson.FillData FirstName, LastName, BirthDate
  Set Create = NewPerson
End Function
'figure 5-1: PersonFactory module.
We can then revise the calling code from figure 4‑3 to look like this:
Public Sub Test()
  Dim p As IPerson
  Set p = PersonFactory.Create("John", "Doe", #1970-01-01#)
End Sub
'figure 5-2: revised calling code using a PersonFactory module.
Note that we now only have an IPerson variable; we don’t even need to know that it’s the Person class that is the implementation for the variable. More importantly, we are able to hide the members of Person class:
Figure 5-3: the object is only exposing the IPerson members, not the Person members.
At this point, we’ve successfully hidden the FillData member and the changes we have introduced makes it much easier for us to analyze our codebase and make wrong code look obviously wrong. You may be wondering what’s stopping us from simply creating a new Person variable and casting to it. The answer is actually nothing, really. However, the same answer applies to preventing us from making a Private procedure a Public one or promoting a local variable to a global one: we know to not make a private procedure public because that breaks the encapsulation and makes for more messy codebase. By the same token, we want to become comfortable using abstractions (e.g. the interfaces) as a perfectly normal way to work with classes where we need to hide the implementation details from the consumers.
You might have noticed that in the figure 5-3, we used the syntax PersonFactory.Create(). A common misconception regarding naming of procedures in VBA is that they cannot be the same name when they are Public and in a standard module. Thus, a common approach would be to name the method something like CreatePerson, which is a OK name. However, trying to come up with unique names for everything can quickly become a hassle. However, there is nothing preventing us from creating a Public Create() As IPerson in a PersonFactory module and a Public Create() As IWidget in a WidgetFactory module! By qualifying our calls to the Create() methods with the module name, it immediately becomes obvious what we are using to create our objects and without the overhead of creating yet another class. This ought to illustrate why semantic naming matters much more than using notations which only add more noise without making wrong code look wrong.
As already has been mentioned, there are different ways we can create factories. It could be an actual class that you could allow the use of New on. It could be a member on the predeclared class module. It depends on what you need. The key takeaway here is that by separating the concern of creating objects from the code that consumes them, we are able to make good use of interfaces to hide the members of the implementations.
Conclusion
You’ve learned how to create a class module and apply some of the good design principle including encapsulating and separating the concerns. You’ve also learned how you can use interfaces to control the access to members that shouldn’t be used by the calling code promiscuously. All those combine up to enable us to write a codebase that compiler is able to validate and enforce for us. Having the compiler do the work for us means we have less work when we review and try to understand what the code is doing. You’ve seen that does require more objects. We’ve had to create 2 class modules, 1 standard module and another standard module to do the testing/calling. With the original UDT approach outlined in section 2, it might be possible to do all in one module. A number of VBA developers may feel that keeping everything in one module makes for easier porting of code from one project to another. They may also feel that protecting the internals is easier to do with Private methods. However, as you saw, sometimes that is simply not possible using a UDT which need public methods to provide “API” around it. Also, too many private members within a module usually makes the code untestable and brittle. Finally, using a Worksheet, UserForm, or an Access form as the “class” only encourages highly coupled code that itself cannot be verified at compile-time. It is possible to set up a convention of doing things but if the convention can’t be enforced by the compiler, we would have do additional work in analyzing the code to ensure it is doing what it is intended. We will analyze those issues in a future post.
By applying good OOP design principles, we are able to make it easier on ourselves to write verifiable and testable code. The concern with managing the number of modules and being able to easily refactor code is actually a problem with the IDE, not with the language. For that reason, Rubberduck exists to alleviate those shortcomings and make it easier to apply good OOP design principles to your VBA code.
Ever wondered why sometimes the VBE tells you what the members of an object are, how to parameterize these member calls, what these members return… and other times it doesn’t? Late binding is why.
Rubberduck’s static code analysis is currently powerful enough to issue an inspection result for code that would fail to compile with VB.NET’s Option Strict enabled. It’s not yet implemented. But in the meantime, you can still benefit from writing modern VBA code that passes the Option Strict rules (at least as far as late binding is concerned)… and essentially eliminate the possibility for error 438 to ever be raised in your code.
If you’re coding against a dynamic API, then this isn’t really applicable. But for literally everything else, it’s a must.
What is Late Binding?
A quick Twitter survey revealed that a majority (67%) of VBA developers (well, at least those following the @rubberduckvba account) associate the term “late binding” with the CreateObject function. While it’s true that CreateObject is the only way to create an instance of an object for which you don’t have a compile-time reference, it’s mostly a mechanism for creating an object through a registry lookup: the function accepts a ProgID or a GUID that corresponds to a specific class that must exist in the Windows Registry on the machine that executes the code. If the ProgID does not exist in the registry, an error is raised and no object gets created. While this is useful for providing an alternative implementation (handle the error and return another, compatible object), it is rarely used that way – and then there’s this common misconception that CreateObject can somehow magically create an object out of thin air, even if the library doesn’t exist on the target machine. If you’re reading a blog that says or insinuates something to that effect (I’ve seen a few), close that browser tab immediately – you’re being grossly mislead and there’s no telling what other lies can be on that page.
If you’re still skeptical, consider these two simple lines of code:
Dim app As Excel.Application
Set app = CreateObject("Excel.Application")
Assuming this code compiles, no late binding happening here: all CreateObject is doing, is take something very simple (Set app = New Excel.Application) and make it very complicated (locate the ProgID in the registry, lookup the parent library, load the library, find the type, create an instance, return that object).
Late binding occurs whenever a member call is made against the Object interface.
Dim app As Object
Set app = CreateObject("Excel.Application")
If we’re not in Excel and need some Excel automation, referencing the Excel type library gives us the ability to bind the Excel.Application type at compile-time, however early binding is version-specific… which means if you code against the Excel 2016 type library and one of your users is running Excel 2010, there’s a chance that this user can’t compile or run your code (even if you’re careful to not use any of the newer APIs that didn’t exist in Excel 2010) – and this is where late binding is useful: now the code works against whatever version of the library that exists on that user’s machine (still won’t magically make a Worksheet.ListObjects call succeed in, say, Excel 2003). The downside is, obviously, that you can’t declare any Worksheet or Workbook object: since the library isn’t referenced, the compiler doesn’t know about these classes, or any of the xlXYZ global constants defined in that library.
Things get hairy when you start using late binding for libraries that are essentially guaranteed to exist on every Windows machine built this century. Like Scripting, or several others – if your code can’t work without these libraries present, late-binding them isn’t going to solve any problem. Rather, it will likely cause more of them… because late-bound code will happily compile with typos and glaring misuses of a type library; you don’t get IntelliSense or parameter QuickInfo as you type, and that is basically the best way to run into run-time error 438 (member not found):
Dim d As Object
Set d = CreateObject("Scripting.Dictionary")
d.Add "value", "key" 'or is it "key", "value"?
If d.ContainsKey("key") Then 'or is it d.Exists("key")?
   '...
End If
It’s not about project references
Late binding isn’t about what libraries are referenced and what types need to be created with CreateObject though: not referencing a library forces you to late-bind everything, but late binding can (and does!) also occur, even if you don’t use anything other than the host application’s object model and the VBA standard library: every time anything returns an Object and you make a member call against that object without first casting it to a compile-time known interface, you are making a late-bound member call that will only be resolved at run-time.
Try typing the below examples, and feel the difference:
Dim lateBound As Object
Set lateBound = Application.Worksheets("Sheet1")
latebound.Range("A1").Value = 42

Dim earlyBound As Worksheet
Set earlyBound = Application.Worksheets("Sheet1")
earlyBound.Range("A1").Value = 42
Worksheets yields an Object that might be a Worksheet reference, or a Sheets collection (depending if you’ve parameterized it with a string/sheet name or with an array of sheet names). There are dozens of other methods in the Excel object model that return an Object. If you’re automating Excel from VB.NET with Option Strict turned on, late-bound member calls are outright forbidden.
VBA is more permissive, but it is our duty as VBA developers, to understand what’s happening, why it’s happening, and what we can do to make things more robust, and fail at compile-time whenever it’s possible to do so. By systematically declaring explicit types and avoiding member calls against Object, we not only accomplish exactly that – we also…
Learn to work with a less permissive compiler, by treating late-bound calls as if they were errors: hopping into the .NET world will be much less of a steep learning curve!
Learn to work better with the object model, better understand what types are returned by what methods – and what to look for and what to research when things go wrong.
Write code that better adheres to modern programming standards.
Late binding isn’t inherently evil: it’s a formidable and powerful tool in your arsenal. But using it when an early-bound alternative is available, is abusing the language feature.
Whenever you type a member call and the VBE isn’t telling you what the available members are, consider introducing a local variable declared with an explicit type, and keeping things compile-time validated – as a bonus, Rubberduck will be able to “see” more of your code, and inspections will yield fewer false positives and fewer false negatives!
As was shared a week or two ago on social media, Rubberduck contributor and supporter Andrew “ThunderFrame” Jackson passed away recently – but his love for VBA, his awesomely twisted ways of breaking it, his insights, the 464 issues (but mostly ideas, with 215 still open as of this writing) and 30 pull requests he contributed to Rubberduck, have shaped a large part of what this project is all about, and for this release we wanted to honor him with a special little something in Rubberduck, starting with the splash screen.
Last December we lost a very valued contributor and friend. Next release the Rubberduck splash screen will be in his memory: that devil ducky was his online avatar.
— Rubberduck VBIDE add-in (@rubberduckvba) March 14, 2019
Andrew joined the project very early on. He gave us the signature spinning duckies and the SVG icon of the project; he once implemented a very creative way to make unit testing work in Outlook (and I know a certain duck that had to eat their hat because of it!), before the feature was made host-agnostic. He gave us the weirdest, most completely evil-but-still-legal VBA code we could possibly test Rubberduck’s parser/resolver with – and we’re very proud to have a ThunderCode-proof parser now!
What’s New?
This isn’t an exhaustive list. See the release notes for more information.
¡Rubberduck ahora habla español!
This release introduces Spanish language support. German, French, and Czech translations have also been updated.
Rubberduck doesn’t speak your language yet? Nothing would make us happier than helping you help us translate Rubberduck! See contributing.md for all the details, and don’t hesitate to ask any questions you have – go on, fork us!
The project’s many resource files are easily handled with the ResX Manager add-in for Visual Studio.
UI Enhancements
The Test Explorer has had a rather impressive facelift, Inspection Results are now much easier to review, navigate and filter. There is a known issue about the GroupingGrid control expanding/collapsing all groupings together, but we weren’t going to hold back the release for this – we will definitely address it in a near-future release though.
Toggle buttons in the toolbar now allow filtering inspection results by severity, and grouping by inspection type, by module, by individual inspection, or by severity. Similar toggle buttons in the Test Explorer allow grouping tests by outcome, module, or category. Tests can be categorized by specifying a category name string as an argument to the @TestMethod annotation.
Parser performance has improved, especially for the most common usages of “bang” (foo!bar) notation, which remain a difficult language construct to handle. But they’re also late-bound, implicit, default member calls that would probably be better off made explicit and early-bound.
Self-Closing Pair completion works rather nicely now, with only two known, low-priority edge cases that don’t behave quite as nicely as they should.
Easter Is Coming
And with Easter comes… White WalkersEaster Eggs, so all I’m going to say, is that they’ll be flagging ThunderCode – the kind of code our friend loved to test & push the limits of Rubberduck’s parser with. If your code trips a ThunderCode inspection, …nah, it can’t happen.
Woopsie, might happen after all. We’ll eventually figure out a way to hide them from the settings!
Also it’s apparently not impossible that there’s no way noother Easter Eggs werenever notadded to Rubberduck. For the record I don’t know if this means what I think I mean it to say, and that’s perfect.
What’s Next?
Some very important changes have been waiting for this release and will be merged in the next few weeks – these changes won’t necessarily be visible from a user standpoint, but they will greatly enhance our internal API – refactorings, COM object management, and we’ll be leveraging more of the TypeLibs API, which in turn should end up translating into greatly enhanced user experience and feature set.
Next release will include a few new inspections, including one that locates obsolete While...Wend loops, and suggests to rewrite them as Do While...Loop blocks, which can be exited with an Exit Do statement, whereas While loops can only be prematurely exited (without throwing an error) by an inelegant GoTo jump.
We really want to tighten our release cycle, so we’ll be shooting for the end of April for what should be version 2.4.2.
Unlike quite a number of Rubberduck releases, this time we’re not boasting a thousand commits though: we’re looking at well under 300 changes, but if the last you’ve seen of Rubberduck was 2.3.0 or prior, …trying this release you’ll quickly realize why we originally wanted to release it around Christmas.
So, here’s your belated Christmas gift from the Rubberduck dev team!
VBE Project References: CURED!
You may have seen the Introducing the Reference Explorer announcement post last autumn – well, the new feature is now field-tested, works beautifully, instinctively, and is ready for prime time. It’s a beauty!
The add/remove references dialog has seen a number of enhancements since its pre-release: thanks everyone for your constructive feedback!
Quickly locate any type library by name and/or description.
Pin your favorite references, and Rubberduck will keep them handy for all your VBA/VB6 projects.
You’ll never want to use the vanilla-VBE references dialog again!
If you’ve been following the Rubberduck project for quite some time, you may remember something about using annotations together with inspections and quick-fixes to document the presence of module & member attributes. You may also remember when & why the idea was dropped. Keeping in tradition with including new inspections every release… Surprise, it’s coming back!
German, French, and Czech translations have been updated, a number of bugs were fixed in a few inspections, the Code Explorer has seen a number of subtle enhancements, and WPF binding leaks are all but gone.
Code Explorer Enhancements
Adding the Reference Explorer made a perfect opportunity to revisit the Code Explorer toolwindow – our signature navigation feature. Behold, the new Code Explorer:
The new ‘Sync with code pane’ toolbar button (the left/right arrows icon) selects the treeview node closest to the current code pane selection.
There’s a new ‘Library References’ node that shows your project’s library dependencies …whether they’re in use or not:
Find all references can now be used to locate all uses of a given type library – including the built-in standard libraries! Note that rendering lots of search results in a toolwindow will require confirmation if there are too many results to display.
The project reference nodes get new icons:
Classes with a VB_PredeclaredID attribute set to True now have their own icon too (and their names now say (Predeclared) explicitly), and class modules marked with an @Interface annotation now appear with an “interface” icon, like IGameStrategy here:
Annotations & Attributes
They’re back, and this time it does work, and it’s another game changer: Rubberduck users no longer need to export any code file to modify module & member attributes!
Module & Member Annotations
At module level, the @ModuleDescription annotation can be given a string argument that controls the value of the module’s VB_Description attribute; the @Exposed annotation controls the value of the VB_Exposed attribute; the presence of a @PredeclaredId annotation signals a VB_PredeclaredId attribute with a value of True.
At member level, @Description annotations can be given a string argument that controls the value of the member’s VB_Description attribute.
Through inspections, Rubberduck is now able to warn about attributes that don’t have a corresponding annotation, and annotations that don’t have a corresponding attributes. Look for inspection results under the “Rubberduck Opportunities” category.
v2.4.x
The months to come will see further enhancements in several areas; there are several pull requests lined up already – stay tuned, and keep up with the pre-release builds by watching releases on GitHub!
Back in the 2.1.x announcement post over a whole year ago, one of the bullet points about the upcoming roadmap said we were going to “make you never want to use the VBE’s Project References dialog ever again“; it took a bit longer than expected, but as far as we can tell, this feature does exactly that.
If you’ve been following the project on social media recently, you already know that the next version of Rubberduck will introduce a very exciting, unique new feature: the Reference Explorer dialog, and the addition of a references node in the Code Explorer tree.
Vanilla-VBE
Since forever, adding a reference to the active project in the VBE is a rather… vanilla experience. Functional, but somewhere between bland and tedious.
What’s wrong with it?
Regardless of what we think of the very 1998-era buttons docked on the side, the dialog works. There’s a list of available libraries (sorted alphabetically), we can browse for unlisted ones, cancel or accept changes, and the libraries that are selected when the dialog is displayed, are conveniently shown at the top of the list!
On a closer look though…
The vanilla-VBE project references dialog
The list of available libraries has the available libraries listed in alphabetical order. You can’t resize the dialog to show more, but you get first-key search. The Scripting runtime’s library name starts with “Microsoft”… which happens to also be the case for a few other libraries; this makes the extremely useful Scripting.Dictionary and Scripting.FileSystemObject classes pretty much hidden until you stumble upon a blog post or a Stack Overflow answer that introduces them.
The selected libraries show up at the top of the list, in priority order. Locked libraries are stacked at the top. You use the up/down arrow buttons to move the selected library up or down, but you can’t move the locked ones.
The priority buttons are used to determine the identifier resolution order; if an identifier exists in two or more libraries, VBA/VB6 binds to the type defined in the library with the highest priority. There’s no visual cue in the list itself to identify the locked-in type libraries, so the Enabled state of these buttons is used to convey that information: you can’t move the locked-in, default references.
The bottom panel is useful… but the path gets cropped if it’s longer than the rather narrow dialog can fit, and you can’t select or copy the text. The actual library version number isn’t shown.
Visual Studio
Let’s take a look at what adding a project reference using the latest version of Microsoft Visual Studio feels like:
The Microsoft Visual Studio 2017 Reference Manager dialog
The dialog can be resized, search is no longer limited to a single character, but still limited to the beginning of the [Name]. The library info is now richer; it moved to the right side, and a panel on the left side determines the contents of the list. Other than that, besides a new [Version] column and a nice dark theme, …the mechanics are pretty much the same as they were 20 years ago: check boxes in a list. Priority is no longer relevant in .NET though – namespaces fixed that.
Rubberduck
This screenshot was taken shortly before the pull request was opened:
The Rubberduck ‘Add/Remove References’ dialog (work in process: release build may differ)
Available libraries appear in a list on the left-hand side of the dialog. Like in Visual Studio, the version number appears next to the library name, and the list is sorted alphabetically. There is no checkbox: instead, the selected library can be moved into the list of referenced libraries.
Referenced libraries appear in a list on the right-hand side of the dialog. Since there is no checkbox, the selected library can be moved back into the list of available libraries.
Priority up/down buttons appear for the selected referenced library, unless it’s locked.
Icons differentiate locked libraries, libraries that were already referenced when the dialog was shown, and libraries that were newly added. In the list of available libraries, recent and pinned libraries have an icon too.
Search works on a “contains” basis, and matches the library name, description, and path. It immediately filters the list of available libraries.
Tabs for quickly accessing type libraries recently referenced, or pinned libraries, or registered. Host-specific project types are in a separate tab, as applicable.
Bottom panel displays the full name and path of the selected type library. The text can be selected and copied into the clipboard.
Browse button allows referencing any project/library that isn’t listed anywhere. If a library can’t be loaded, it will appear in the list as a broken reference, before it’s even tentatively added to the project.
If you haven’t seen it in action yet, here’s a sneak peek:
Of course that’s just the beginning: layout is not completely final, drag-and-drop functionality remains to-do, among other enhancements.
A first iteration of this feature will likely be merged some time next week, and since this is a major, completely new feature, we’ll bump the minor version and that will be Rubberduck 2.4.0, to be released by the end of 2018…
…not too long after the imminent 2.3.1 hotfix release.
If you think this is one of the coolest things a VBE add-in could possibly do, you’re probably not alone. Share the news, and star us on GitHub!